Architecture
Meltano Model
Meltano Models allow you to define your data model and interactively generate SQL so that you can easily analyze and visualize it in Meltano UI.
An analysis model is an interchangeable term for meltano model.
Concepts
Below are definition for each concept used within a Meltano Model.
Topic
A Topic is a group of one or many Designs that determines how they will be mapped together.
A Topic can be identified by the naming schema: <name>.topic.m5o and should be stored in the /model directory.
Design
A Design maps multiple Tables together via Joins and represent the query context required for the actual analysis.
Each Design is also a Source, and thus can be refered to by the Joins it defines.
# defines a Design named `sample`
sample {
  from: table_name
  joins {
    # defines a Join named `join_a`
    join_a {
      from: table_a
      # we refer to the `Source's name` here
      sql_on: "sample.a_id = join_a.a_id"
    },
    …
  }
}
Designs are defined inside their corresponding Topic file.
Join
A Join represent the relationship between two Sources.
Each Join is also a Source so it can be refered to in by another Join defined in the same Design.
sample {
  from: table_name
  joins {
    join_a {
      from: table_a
      sql_on: "sample.a_id = join_a.a_id"
    },
    join_b {
      from: table_b
      # we can refer to `join_a` as it is defined in the same `Design`
      sql_on: "join_a.b_id = join_b.b_id"
    }
  }
}
Source
A Source is defined as something that refers to a Table in a Design context. It is crucial for Designs that refers to the same Table multiple times, because it serves as unique identifier for the scope of the query.
Table
A Table relates to a table in a database. It defines a direct link to a table in the database. In addition, it also defines and contains columns and aggregates so you can select which you want to show.
A Table can be identified by the file naming schema: <name>.table.m5o and should be stored in the /model directory.
Aggregate
An Aggregate relates to a calculable column, via count, sum or other (i.e., aggregate definitions). These are limited to predefined methods with no custom SQL as well since custom SQL will be handled through transforms with dbt.
An Aggregate can be referred as an Attribute in a Design context.
Column
A Column relates directly to a column in a table of a database. Some limitations of this are that it will be limited to column only and no custom SQL.
A Column can be referred as an Attribute in a Design context.
Discover Available Models
To see what models are currently available in the Meltano ecosystem, run the following command:
meltano discover models
Add a Model
To add an existing model to your Meltano project, run the following command:
meltano add model [name_of_model]
Create a New Model
Setup
There are two foundational steps required for Meltano to extract, load, and transform your data for analysis in Meltano UI:
- Define each
Tablefor a data source (as<name>.table.m5o) - Define
Topicsfor each analysis you want to run (as<topic>.topic.m5o)
Model Authoring (.m5o files)
The .m5o file extension is unique to Meltano but adheres to the HOCON (Human-Optimized Config Object Notation) format. Below are examples with comments to aid the authoring of your ...model.m5o and ...table.m5o files mentioned above.
Example carbon.topic.m5o file
# Define a database, connection settings, and the table relationships (further defined in each `my-table.table.m5o` file) to inform Meltano how to connect for ELT, orchestration, and interactive SQL generation using the Meltano UI
{
  # Define version metadata
  version = 1
  # Define the name of the database used to denote automatically generated .m5oc for use by Meltano
  name = carbon
  # Define the database connection
  connection = runners_db
  # Define GUI label
  label = carbon intensity
  # Define base tables and their respective join relationships
  designs {
    # Define the base table(s) of interest (further defined in each my-table.table.m5o file) that will be GUI joinable and subsequently used for generating SQL queries
    region {
      # Define GUI label
      label = Region
      # Define from table name
      from = region
      # Define GUI description
      description = Region Carbon Intensity Data
      # Define joinable table(s) of this base table
      joins {
        # Define name of join table
        entry {
          # Define GUI label
          label = Entry
          # Define table columns of interest that will be GUI selectable and subsequently used for generating SQL queries
          fields = [entry.from, entry.to]
          # Define the SQL join condition
          sql_on = "region.id = entry.region_id"
          # Define join relationship
          relationship = one_to_one
        }
      }
    }
  }
}
Example entry.table.m5o file
# Define a database table for connecting to using Meltano's CLI and/or UI
{
  # Define the schema.table-name pattern used for connecting to a specific table in a database
  sql_table_name = gitlab.entry
  # Define the table name
  name = entry
  # Define the column(s) of interest that will be GUI selectable and subsequently used for generating SQL queries
  columns {
    # Define column name
    id {
      # Define GUI label
      label = ID
      # Define the primary key (only one per colums definition)
      primary_key = yes
      # Define GUI visibility
      hidden = yes
      # Define data type so ELT process properly updates the data warehouse
      type = string
      # Define the SQL that selects this column
      sql = "{{table}}.id"
    }
  }
  # Define time-based column(s) of interest that will be GUI selectable and subsequently used for generating SQL queries
  timeframes {
    from {
      label = From
      description = Selected from range in carbon data
      type = time
      # `part` refers to the DATE_PART SQL function:
      # https://www.postgresql.org/docs/8.1/functions-datetime.html#FUNCTIONS-DATETIME-EXTRACT
      periods = [{ name = week, label = Week, part = WEEK },
                 { name = month, label = Month, part = MONTH },
                 { name = year, label = Year, part = YEAR }]
      convert_tz = no
      sql = "{{TABLE}}.from"
    }
    to {
      label = To
      description = Selected to range in carbon data
      type = time
      # `part` refers to the DATE_PART SQL function:
      # https://www.postgresql.org/docs/8.1/functions-datetime.html#FUNCTIONS-DATETIME-EXTRACT
      periods = [{ name = week, label = Week, part = WEEK },
                 { name = month, label = Month, part = MONTH },
                 { name = year, label = Year, part = YEAR }]
      convert_tz = no
      sql = "{{TABLE}}.to"
    }
  }
}
With these files the Meltano CLI (or in conjunction with the Meltano UI) can properly extract, load, and transform your data for analysis using Meltano UI.
M5O Files
There are two types of .m5o files:
.m5oare user defined files that model the data in your database.m5ocare compiled files generated from multiplem5ofiles
The .m5o files are based on the JSON-like HOCON syntax and serve as input for the compiled .m5oc files that Meltano then leverages.
Report
A Report is a saved state of selecting and analyzing a Design. It contains a subset of fields that you select from multiple tables and is ultimately the selected analysis. It can also be generated from raw SQL.
A Report can be identified by the file naming schema: <name>.report.m5o and should be stored in the /model directory.
Dashboard
A Dashboard is a group of many Reports.
A Dashboard is identified by the file naming schema: <name>.dashboard.m5o and should be stored in the /model directory.
Meltano UI
Meltano UI is a dashboard that allows you to interactively generate and run SQL queries to produce data visualizations, charts, and graphs based on your data.
Meltano ELT
Meltano uses Singer Taps and Targets to Extract the data from various data sources and load them in raw format, i.e. as close as possible to their original format, to the Data Warehouse. Subsequently, the raw data is transformed to generate the dataset used for analysis and dashboard generation.
Taps
A Tap is an application that pulls data out of a data source by using the best integration for extracting bulk data.
For example, it takes data from sources like databases or web service APIs and converts them in a format that can be used for data integration or an ETL (Extract Transform Load) pipeline.
Meltano's taps is part of the Extractor portion of the data workflow and are based on the Singer specification.
Targets
A Target is an application that has the responsibility of consuming data from taps and perform a task with it. Examples include loading it into a file (i.e., CSV), API, or database.
Meltano targets is part of the Loader portion of the data workflow.
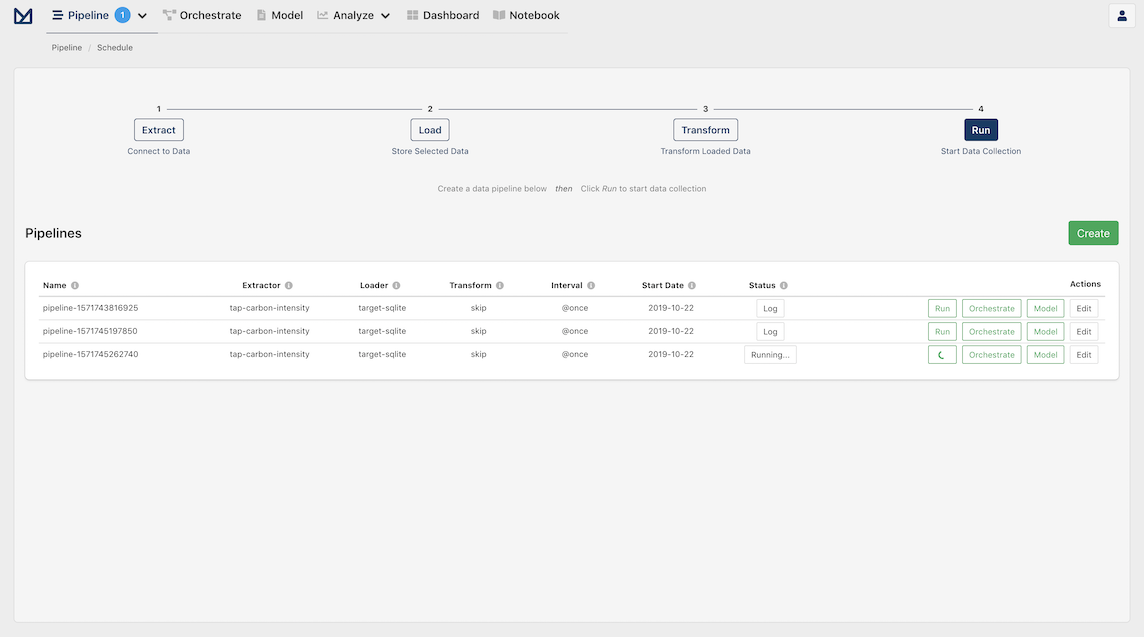
Pipelines
Meltano can be used in any ELT architecture by using the right taps and targets for the job. The strategies supported can range from dumping the source data in a data lake to keeping all historical versions for each record to storing well formatted, clean data in the target data store.
When considering which taps and targets Meltano will maintain, some assumptions are followed concerning how source data is stored in the target data store:
All extracted data is stored in the same Target Database, e.g., we use a Database named
RAWfor storing all extracted data to Snowflake.For each tap's data source, a schema is created for storing all the data that is extracted through a tap. E.g., The
RAW.SALESFORCEschema is used for data extracted from Salesforce, and theRAW.ZENDESKschema is used for data extracted from Zendesk.Every stream generated from a tap will result in a table with the same name. That table will be created in the schema from that tap based on the information sent in the
SCHEMAmessage.Meltano supports schema updates for when a schema of an entity changes during an extraction. This is enacted when Meltano receives more than one
SCHEMAmessage for a specific stream in the same extract load run.When a SCHEMA message for a stream is received, our Targets check whether there is already a table for the entity defined by the stream.
- If the schema for the tap does not exist, it is created.
- If the table for the stream does not exist, it is created.
- If a table does exist, our Targets create a diff to check if new attributes must be added to the table or already defined attributes should have their data type updated. Based on that diff, the Targets make the appropriate schema changes.
Rules followed:
- Only support type upgrades (e.g., STRING -> VARCHAR) for existing columns.
- If an unsupported type update is requested (e.g., float --> int), then an exception is raised.
- Columns are never dropped. Only UPDATE existing columns or ADD new columns.
Data is upserted when an entity has at least one primary key (key_properties not empty). If there is already a row with the same composite key (combination of key_properties) then the new record updates the existing one.
No key_properties must be defined for a target to work on append-only mode. In that case, the target tables will store historical information with entries for the same key differentiated by their
__loaded_attimestamp.If a timestamp_column attribute is not defined in the SCHEMA sent to the target for a specific stream, it is added explicitly. Each RECORD has the timestamp of when the target receives it as a value. As an example,
target-snowflakesets the name of that attribute to__loaded_atwhen an explicit name is not provided in the target's configuration file.When a target is set to work on append-only mode (i.e. no primary keys defined for the streams), the timestamp_column's value can be used to get the most recent information for each record.
For targets loading data to Relational Data Stores (e.g., Postgres, Snowflake, etc.), we unnest nested JSON data structures and follow a
[object_name]__[property_name]approach similar to what Stitch platform also does.At the moment we do not deconstruct nested arrays. Arrays are stored as JSON or STRING data types (depending on the support provided by the target Data Store) with the relevant JSON representation stored as is. e.g. "['banana','apple']". It can then be extracted and used in the Transform Step.
Concurrency
The Singer spec doesn't define how to handle concurrency at the ELT level.
Making the streams concurrent themselves is pretty straightforward, but making sure the state handles concurrent updates is the real challenge, and also source specific. Some sources supports pagination endpoints or a cursor-like API, but not all APIs are made equal.
Also depending on the data source, you might have some limit on how concurrent you can be, for example Salesforce limits to 25 concurrent request, but Netsuite allows only one query at a time per account.
For now, Meltano will try to implement concurrent taps when possible.
Job logging
Every time meltano elt ... runs, Meltano will keep track of the job and its success state in a log.
In Meltano UI, you can visit the Pipelines page and check the log of any past pipeline by clicking the Log button next to it. You can check the logs generated for running pipelines by clicking the Running... button:
For example, the following screenshot shows the log of a completed pipeline:
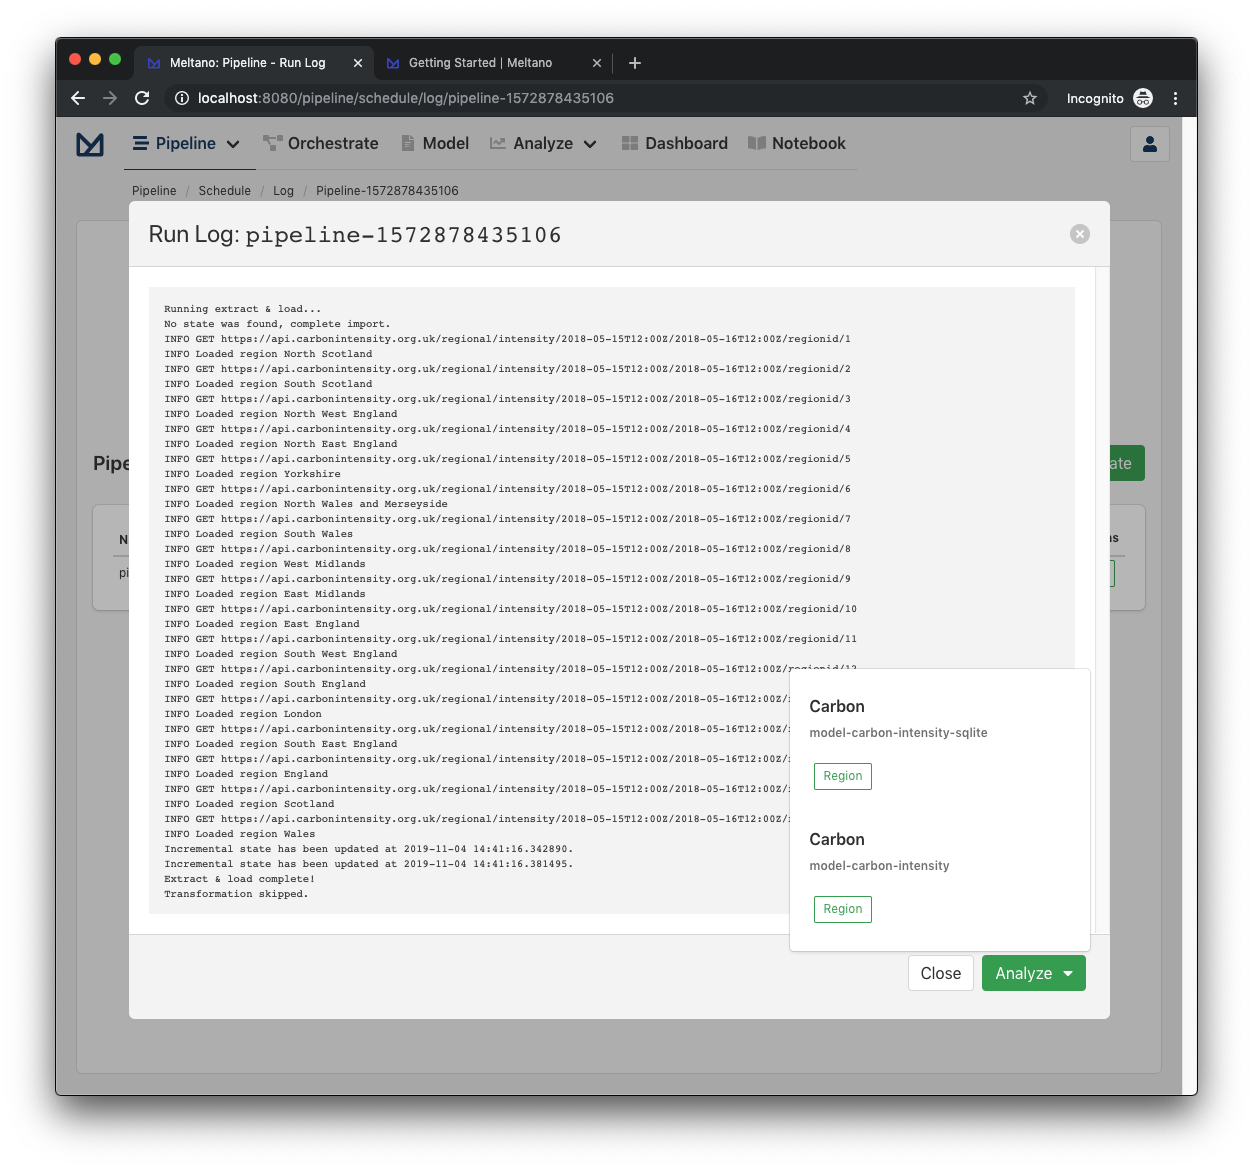
All the output generated by meltano elt ... is logged in .meltano/run/elt/{job_id}/{run_id}/elt.log
Where run_id is a UUID autogenerated at each run and the job_id can be one of the following:
- The name of the pipeline created by Meltano UI; e.g.
pipeline-1571745262740. - The
job_idprovided to themeltano elt ... [--job_id TEXT]CLI command. - It is autogenerated using the current date and time if it is not provided when the
meltano eltCLI command runs.
How ELT Commands Fetch Dependencies
When you run ELT commands on a tap or target, this is the general process for fetching dependencies:
- First, the CLI looks in the project directory that you initialized
- Then it looks in the global file (
discovery.yml) for urls of a package or repo- Note: This will eventually be moved into its own repository to prevent confusion since you cannot have local references for dependencies
- If this is the first time that the dependencies are requested, it will download to a local directory (if it is a package) or cloned (if it is a repo)
- By doing this, you ensure that packages are version controlled via
discovery.ymland that it will live in two places:- in the project itself for the user to edit
- in a global repo for meltano employees to edit
Meltano Transformations
In order for data to be in a state where it can be used for generating reports and analyses, it is critical that they are standardized in order for calculations to be run on them. As a result, the data world has a concept of transformations which allow us to take a set of data and ensure that they are ready for analysis.
For example, if we have a simple CSV with a column of data for the sale amount for the day.
sales
-----
$21.00
$42.48
$100
$96.28
It may not be immediately obvious, but when this data is migrated to a database, it is typically converted as a string in order to include the dollar symbol. However, while the formatting is useful for knowing that field represents a currency, this prevents us from performing calculations like average, median, or mean.
As a result, we need to run transformations on our data to the proper data type while also ensuring the data is clean. In other words, we'd like our data to look like this:
sales
-----
21
42.48
100
96.28
Transformation Methodology: dbt
Meltano uses dbt to transform the source data into the analytics schema, ready to be consumed by models.
To get started using dbt, you need to have some knowledge of SQL since this is how you will write your transformations to take raw data into data that's ready for analytics.
For more information on how to use dbt, check out the official dbt documentation site for how it works.
And for a guided tutorial on how to create custom transforms, check out our Create Custom Transforms and Models tutorial!
Python scripts
In certain circumstances transformations cannot be done in dbt (like API calls), so we use python scripts for these cases.
Spreadsheet Loader Utility
Spreadsheets can be loaded into the DW (Data Warehouse) using elt/util/spreadsheet_loader.py. Local CSV files can be loaded as well as spreadsheets in Google Sheets.
Loading a CSV:
Notes:
- The naming format for the
FILESmust be<schema>.<table>.csv. This pattern is required and will be used to create/update the table in the DW.- Multiple
FILEScan be used, use spaces to separate.
- Start the cloud sql proxy
- Run the command:
python3 elt/util/spreadsheet_loader.py csv FILES...
- Logging from the script will tell you table successes/failures and the number of rows uploaded to each table.
Loading a Google Sheet:
Notes:
- Each
FILESwill be located and loaded based on its name. The names of the sheets shared with the runner must be unique and in the<schema>.<table>format- Multiple
FILEScan be used, use spaces to separate.
- Share the sheet with the required service account (if being used in automated CI, use the runner service account)
- Run the command:
python3 elt/util/spreadsheet_loader.py sheet FILES...
- Logging from the script will tell you table successes/failures and the number of rows uploaded to each table.
Further Usage Help:
- Run the following command(s) for additional usage info
python3 elt/util/spreadsheet_loader.py <csv|sheet> -- --help
Access Control
Meltano manages authorization using a role based access control scheme.
- Users have multiple roles;
- Roles have multiple permissions;
A Permission has a context for with it is valid: anything that matches the context is permitted.
Meltano UI in Production
Meltano UI consist of a Flask API and a Vue.js front-end application, which are both included in the meltano package. In other words, the Flask API is not exposed at a project level and any customizations needed must be done at the package level.
To run Meltano in production, we recommend using gunicorn for setting up your HTTP Server.
First, install gunicorn:
pip3 install gunicorn
You can then start Meltano UI:
Note
This is an example invocation of gunicorn, please refer to the gunicorn documentation for more details.
Start gunicorn with 4 workers, alternatively you can use $(nproc):
gunicorn -c python:meltano.api.wsgi.config -w 4 meltano.api.wsgi:app